반응형
ListView 사용법 및 예제는 총 4개의 게시글로 구성되어있습니다.
ListView 사용법 및 예제 -2-(ObservableCollection 사용하기)
ListView 사용법 및 예제 -3-(INotifyPropertyChanged.PropertyChanged 사용하기
ListView 사용법 및 예제 -4-(ListView 꾸미기)
이번게시글에서는 일년이 지나 모든학생의 나이를 증가시키는 예제를 포스팅하겠습니다.
1. MainWindow.xaml
<Window x:Class="ListViewTest.MainWindow"
        xmlns="http://schemas.microsoft.com/winfx/2006/xaml/presentation"
        xmlns:x="http://schemas.microsoft.com/winfx/2006/xaml"
        xmlns:d="http://schemas.microsoft.com/expression/blend/2008"
        xmlns:mc="http://schemas.openxmlformats.org/markup-compatibility/2006"
        xmlns:local="clr-namespace:ListViewTest"
        mc:Ignorable="d"
        Title="MainWindow" Height="300" Width="300">
    <Grid>
        <Grid.RowDefinitions>
            <RowDefinition Height="5*"></RowDefinition>
            <RowDefinition Height="1*"></RowDefinition>
        </Grid.RowDefinitions>
        <ListView Grid.Row="0" Name="studentListView" FontSize="15">
            <ListView.View>
                <GridView>
                    <GridViewColumn Header="name" DisplayMemberBinding="{Binding name}" Width="100"/>
                    <GridViewColumn Header="age" DisplayMemberBinding="{Binding Age}" Width="80"/>
                    <GridViewColumn Header="gender" DisplayMemberBinding="{Binding gender}" Width="80"/>
                </GridView>
            </ListView.View>
        </ListView>
        <Grid Grid.Row="1">
            <Grid.ColumnDefinitions>
                <ColumnDefinition Width="1*"></ColumnDefinition>
                <ColumnDefinition Width="1*"></ColumnDefinition>
            </Grid.ColumnDefinitions>
            <Button Grid.Column="0" Name="AddStudentBtn" Width="80" Height="30" Content="학생추가하기" Click="AddStudentBtn_Click"></Button>
            <Button Grid.Column="1" Name="OneYearAfterBtn" Width="80" Height="30" Content="일년 후" Click="OneYearAfterBtn_Click"></Button>
        </Grid>
    </Grid>
</Window>
일년후 버튼을 추가합니다.
2.MainWindow.cs
namespace ListViewTest
{
    /// <summary>
    /// MainWindow.xaml에 대한 상호 작용 논리
    /// </summary>
    public partial class MainWindow : Window
    {
        ObservableCollection<Student> students = null;
        public MainWindow()
        {
            InitializeComponent();
            students = new ObservableCollection<Student>();
            students.Add(new Student() { name = "John", Age = 21, gender = "남" });
            students.Add(new Student() { name = "Emma", Age = 22, gender = "여" });
            students.Add(new Student() { name = "Jake", Age = 21, gender = "남" });
            students.Add(new Student() { name = "Sophia", Age = 21, gender = "여" });
            studentListView.ItemsSource = students;
        }

        private void AddStudentBtn_Click(object sender, RoutedEventArgs e)
        {
            AddStudentWindow addStudentWindow = new AddStudentWindow();
            if (addStudentWindow.ShowDialog()== true)
            {
                string newName = addStudentWindow.nameBox.Text;
                int newAge = int.Parse(addStudentWindow.ageBox.Text);
                string newGender = addStudentWindow.genderBox.Text;

                students.Add(new Student() { name = newName, Age = newAge, gender = newGender });
            }
        }

        private void OneYearAfterBtn_Click(object sender, RoutedEventArgs e)
        {
            foreach (var item in students)
            {
                item.Age++;
            }
        }
    }

    public class Student : INotifyPropertyChanged
    {
        public string name { get; set; }
        public string gender{ get; set; }
        private int age;
        public int Age
        {
            get
            {
                return age;
            }
            set
            {
                age = value;
                OnPropertyChanged("Age");
            }
        }


        public event PropertyChangedEventHandler PropertyChanged;
        protected void OnPropertyChanged(string prop)
        {

            if (PropertyChanged != null)
            {
                PropertyChanged(this, new PropertyChangedEventArgs(prop));
            }
        }
    }
}
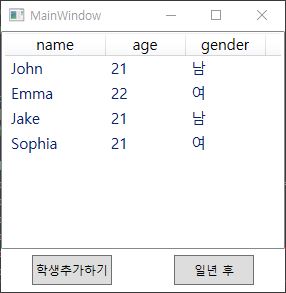
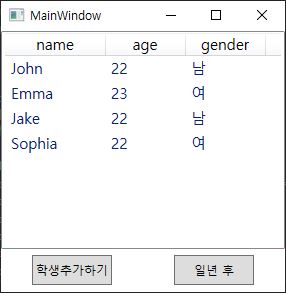
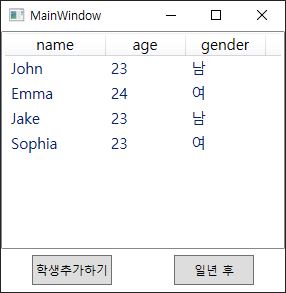
일년 후 버튼을 클릭하면 모든 학생의 나이를 증가시킵니다.
ObservableCollection의 예시와 마찬가지로 학생 클래스에 속성변경 이벤트 처리를 해줘야합니다.
ObservableCollection은 컬렉션내에 템플릿이 추가된경우를 알리며
PropertyChanged는 멤버변수의 변경을 알립니다.
Student 클래스에 INotifyPropertyChanged 인테이스를 상속받아
아래의 내용을 구현합니다.
public event PropertyChangedEventHandler PropertyChanged;
protected void OnPropertyChanged(string prop)
{
if (PropertyChanged != null)
{
PropertyChanged(this, new PropertyChangedEventArgs(prop));
}
}
속성변경이 되는곳(세터)에 PropertChanged를 넣어 속성변경을 알립니다.
3. 실행화면
반응형
'wpf > wpf layout 및 문법' 카테고리의 다른 글
| 외부 Thread에서 UIThread 제어하기(DIspatcher의 이벤트 큐 사용하기) (0) | 2020.10.10 |
|---|---|
| [wpf] ListView 사용법 및 예제 -4-(ListView 꾸미기) (0) | 2020.10.02 |
| [wpf] ListView 사용법 및 예제 -2-(ObservableCollection 사용하기) (0) | 2020.10.02 |
| [wpf] WPF ListView 사용법 및 예제 - 1 - (0) | 2020.10.02 |
| [wpf] MessageBox 사용법 및 예제 (0) | 2020.10.01 |


댓글